保留 Typora 样式的轻量博客搭建指南
保留 Typora 样式的轻量博客搭建指南为导出的HTML文件添加页脚的跳转按钮为导出的HTML文件标题行前跳转按钮✅ Code!▶️ 使用方法🔍 脚本功能特点🌟 在导出时自动添加跳转按钮极简博客主页✅ Index Code!📁 目录结构示例▶️ 使用方法1. 基本使用(默认参数)2. 自定义参数🌟 功能特点💡 提示托管发布笔记为在线博客🌟 本地博客页面生成的流程总结1. 导出 HTML 笔记(Typora)2. 增强页面导航(自动插入跳转按钮)3. 生成博客主页(自动索引)4. 本地预览与验证5. 目录结构示例🌐 为什么选择静态网站托管?🚀 推荐托管平台📦 准备部署目录结构🛠️ 步骤 1:创建 GitHub 仓库📤 步骤 2:推送本地内容到 GitHub🌍 步骤 3:启用 GitHub Pages🔁 自动化更新流程(可选但推荐)🌐 自定义域名(进阶)✅ 验证部署效果🧩 其他平台快速部署(简要)VercelNetlify🎉 小结
本文介绍了一种基于Typora软件的全新的极简笔记博客搭建的方法。相比 VitePress、MkDocs 等静态站点生成器需要编写配置、学习主题系统甚至处理构建流程,本文介绍的 “Typora + Python 脚本”方案提供了一条更轻量、更直观的路径:无需转换格式、无需额外依赖,直接利用 Typora 导出的 HTML,完整保留Typora文章主题样式——包括代码高亮、数学公式、表格布局与内嵌图片。在此基础上,仅用两个简单脚本,即可自动添加导航按钮并生成博客主页,实现“写完即发”、“快速笔记分享”的极简博客体验。
Tip
如果你追求效率、重视所见即所得的写作美感,这套方案使用Typora自带的导出HTML功能,因此能够完整保留Typora原生文章样式(其他构建工具所实现的Markdown转HTML功能会带来样式的渲染差异),快速将笔记转化为在线网页,并带有一个文章索引主页!
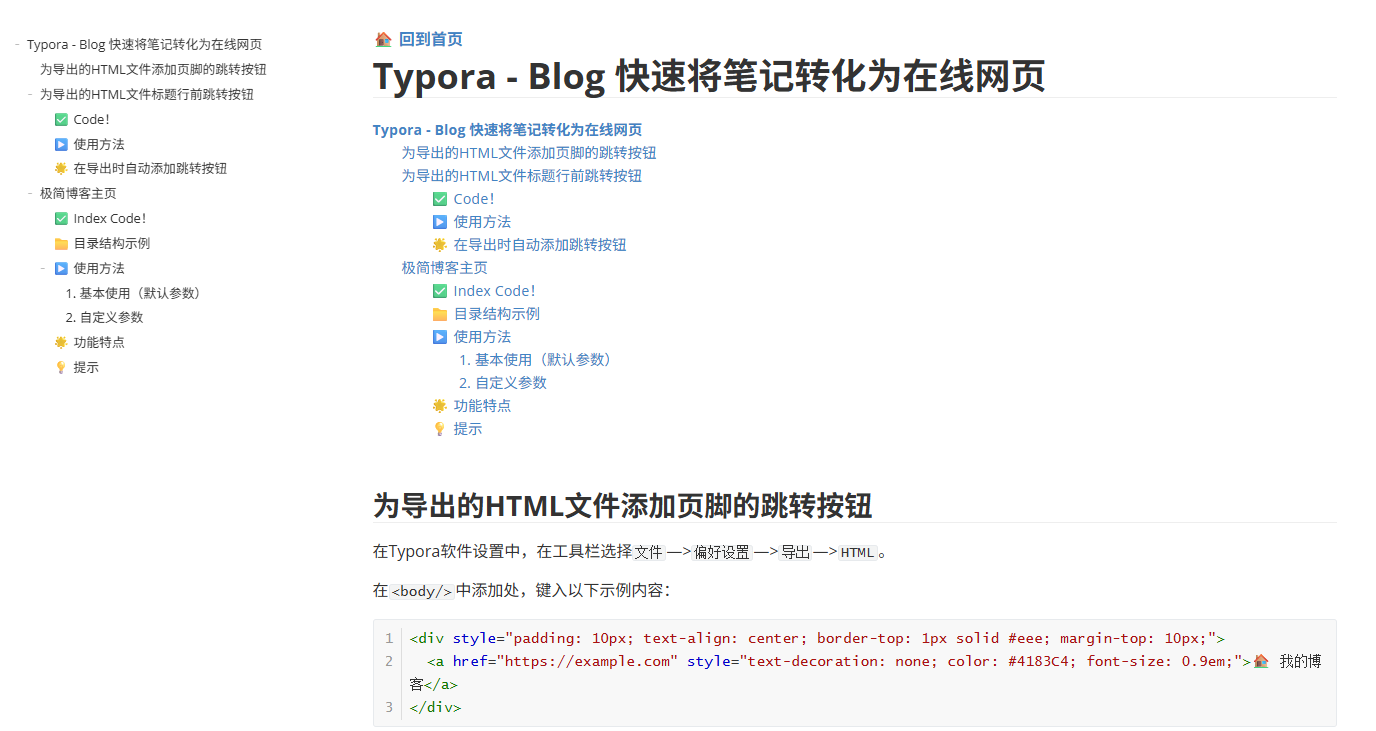
为导出的HTML文件添加页脚的跳转按钮
在Typora软件设置中,在工具栏选择文件—>偏好设置—>导出—>HTML。
在<body/>中添加处,键入以下示例内容:
1<div style="padding: 10px; text-align: center; border-top: 1px solid #eee; margin-top: 10px;">2 <a href="https://example.com" style="text-decoration: none; color: #4183C4; font-size: 0.9em;">🏠 我的博客</a>3</div>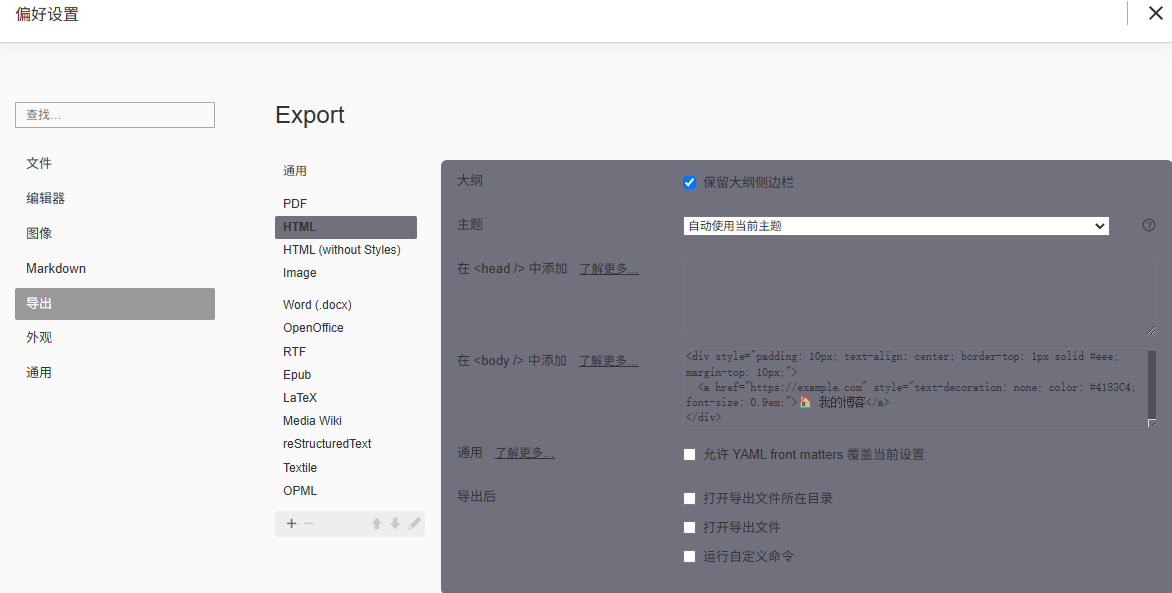
样式示例:
为导出的HTML文件标题行前跳转按钮
✅ Code!
为Typora导出的HTML文件应用主页跳转按钮,来实现文档导航与网页极简博客构建。
实现该功能的typora2blog.py文件内容如下:
x1#!/usr/bin/env python32# -*- coding: utf-8 -*-3
4import argparse5from bs4 import BeautifulSoup6
7import sys8import io9
10if sys.stdout.encoding != 'utf-8':11 sys.stdout = io.TextIOWrapper(sys.stdout.buffer, encoding='utf-8')12
13def add_home_button_to_html(html_content, home_url="https://example.com", button_text="🏠 返回主页"):14 """15 在 HTML 中查找 h1 标签,若不存在则查找第一个 h2 标签,16 并在其之前插入一个靠左的主页跳转按钮。17 """18 soup = BeautifulSoup(html_content, 'html.parser')19 20 # 查找 h1 或 h221 target_tag = soup.find('h1') or soup.find('h2')22 23 if target_tag is None:24 print("警告: 未找到 h1 或 h2 标签,跳过插入按钮。")25 return html_content26 27 # 创建靠左的按钮(只需移除 text-align: center 或设为 left)28 button_p = soup.new_tag("p", **{"style": "text-align: left; margin-bottom: -15px; margin-top: 25px;"})29 button_a = soup.new_tag("a", 30 href=home_url,31 style="text-decoration: none; color: #4183C4; font-size: 1rem; font-weight: bold;")32 button_a.string = button_text33 button_p.append(button_a)34 35 target_tag.insert_before(button_p)36 37 return str(soup)38
39def main():40 parser = argparse.ArgumentParser(description="在 HTML 的 h1/h2 标签前插入靠左的主页跳转按钮")41 parser.add_argument("input_file", help="输入的 HTML 文件路径")42 parser.add_argument("-o", "--output", help="输出的 HTML 文件路径(默认覆盖原文件)")43 parser.add_argument("--url", default="https://example.com", help="主页 URL")44 parser.add_argument("--text", default="🏠 返回主页", help="按钮文本")45 46 args = parser.parse_args()47 48 try:49 with open(args.input_file, 'r', encoding='utf-8') as f:50 html_content = f.read()51 except FileNotFoundError:52 print(f"错误: 文件 {args.input_file} 不存在。")53 return54 except Exception as e:55 print(f"读取文件时出错: {e}")56 return57 58 modified_html = add_home_button_to_html(59 html_content,60 home_url=args.url,61 button_text=args.text62 )63 64 output_file = args.output or args.input_file65 66 try:67 with open(output_file, 'w', encoding='utf-8') as f:68 f.write(modified_html)69 print(f"✅ 成功在 {'h1' if BeautifulSoup(html_content, 'html.parser').find('h1') else 'h2'} 前插入靠左按钮。")70 print(f"📄 输出文件: {output_file}")71 except Exception as e:72 print(f"写入文件时出错: {e}")73
74if __name__ == "__main__":75 main()▶️ 使用方法
首先需要安装 beautifulsoup4:
xxxxxxxxxx11pip install beautifulsoup4在使用Typora软件进行HTML导出时,如果想实现自动化跳转按钮的添加,请在全局的Python环境中,安装
beautifulsoup4而不是在虚拟环境中安装。
指定输出文件(修改原文件)
xxxxxxxxxx11python typora2blog.py you_note.html指定输出文件(不覆盖原文件)
xxxxxxxxxx11python typora2blog.py you_note.html -o output.html自定义跳转 URL 和按钮文字(如不指定,按照源码的默认设置)
xxxxxxxxxx11python typora2blog.py you_note.html --url "https://note.example.top" --text "🏠 回到首页"🔍 脚本功能特点
使用
BeautifulSoup解析 HTML。优先查找第一个
<h1>标签。若无
<h1>,则查找第一个<h2>。创建一个
<p>容器,内含<a>链接,样式与 Typora 导出风格一致。使用
insert_before()方法将按钮插入到目标标题之前。支持命令行参数,灵活配置 URL 和文本。
Important
⚠️ 注意事项
如果既没有
h1也没有h2,脚本会输出提示并跳过修改。脚本会保留原始 HTML 的所有结构和样式。
输出使用
utf-8编码,兼容中文。
这个脚本非常适合批量处理文档(如 Typora 导出的 HTML,对 Typora 导出的HTML文档优化了样式),自动添加导航按钮,提升用户体验。
🌟 在导出时自动添加跳转按钮
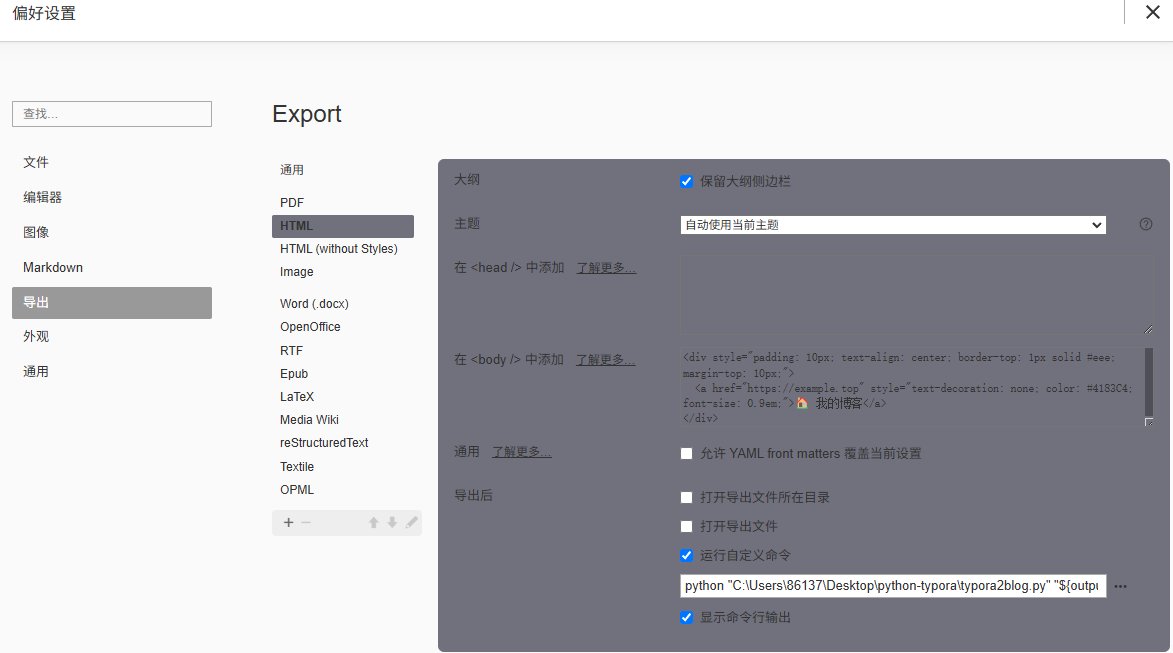
在Typora软件设置中,在工具栏选择文件—>偏好设置—>导出—>HTML。
勾选导出后运行自定义命令,键入以下示例内容:
xxxxxxxxxx11python "C:\Users\86137\Desktop\python-typora\typora2blog.py" "${outputPath}" --url "https://note.example.top" --text "🏠 回到首页"python "你的typora2blog.py文件路径" "${outputPath}" --url "https://跳转链接(首页域名)" --text "跳转提示文本"
推荐跳转地址使用相对路径
xxxxxxxxxx11python "C:\Users\86137\Desktop\python-typora\typora2blog.py" "${outputPath}" --url "../index.html" --text "🏠 回到首页"与
generate_blog_index.py配合使用,以生成具有导航索引的 Web 博客。
示例设置界面:
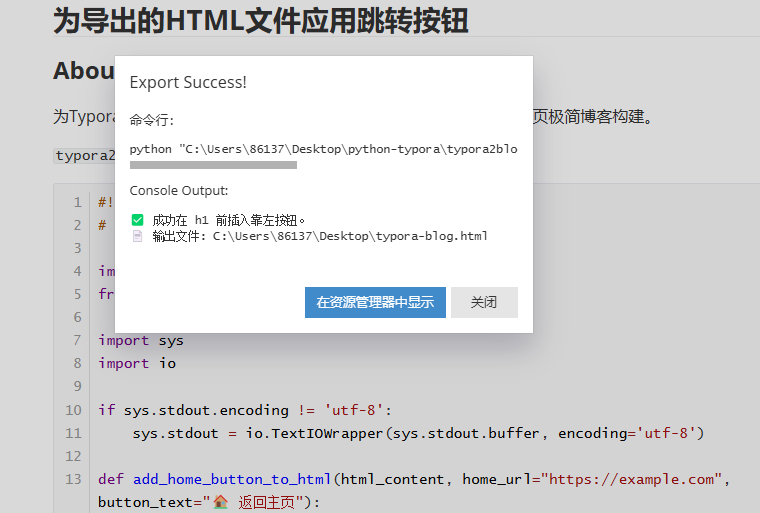
导出时的信息提示:
样式示例:
极简博客主页
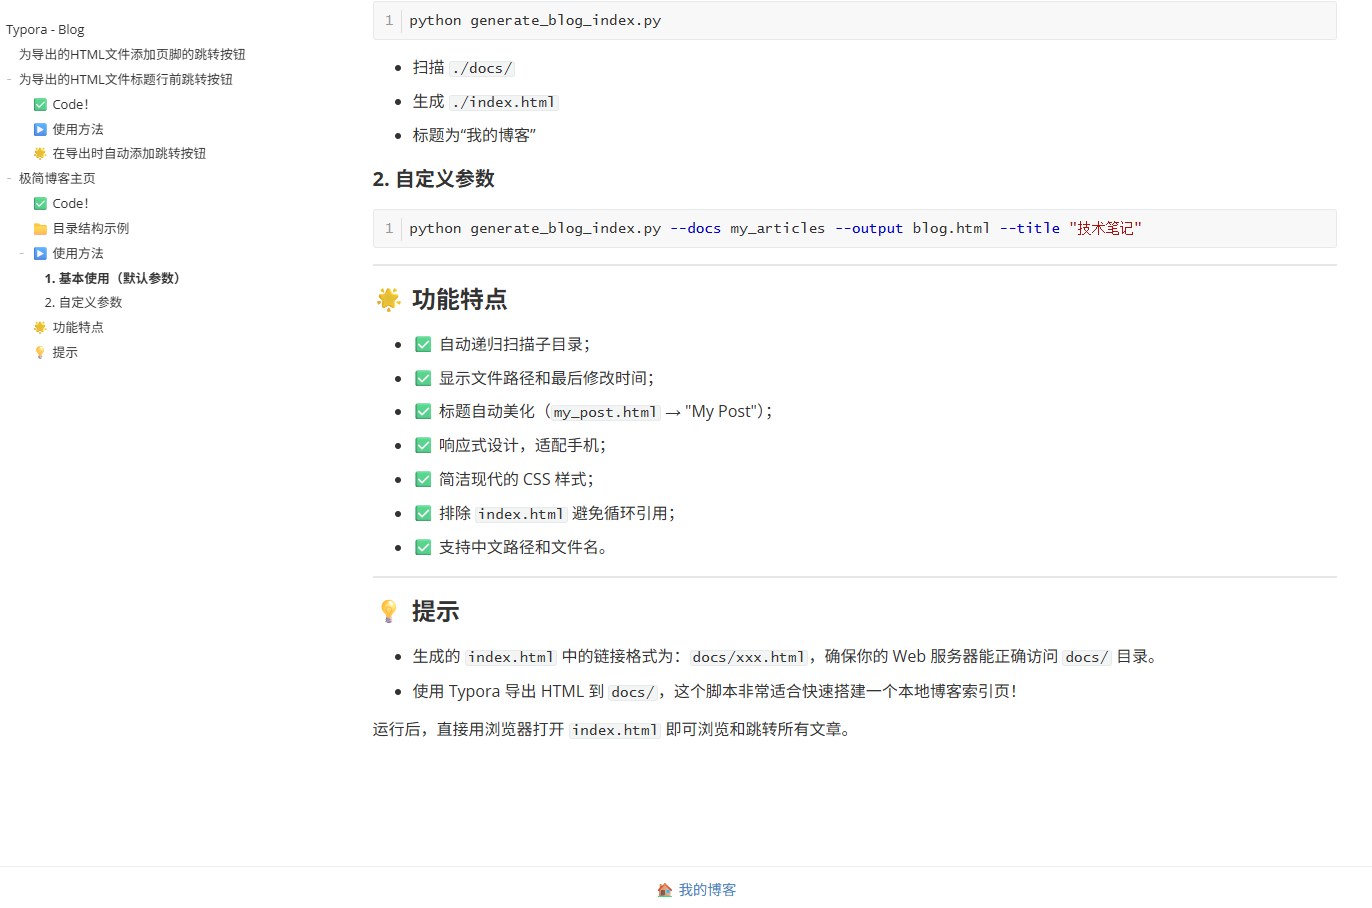
极简的博客主页的创建,能够:
扫描当前目录下的
docs/文件夹;读取其中所有的
.html文件(包括子目录);生成一个简洁美观的博客主页(
index.html);列出所有 HTML 文件,点击即可跳转。
样式示例:

✅ Index Code!
实现相关功能的generate_blog_index.py 代码如下:
xxxxxxxxxx2221#!/usr/bin/env python32# -*- coding: utf-8 -*-3
4import os5import argparse6from pathlib import Path7from datetime import datetime8
9# 尝试导入 BeautifulSoup10try:11 from bs4 import BeautifulSoup12except ImportError:13 print("❌ 错误: 未安装 BeautifulSoup4。请运行以下命令安装:")14 print(" pip install beautifulsoup4")15 exit(1)16
17
18def extract_title_from_html(file_path: Path) -> str | None:19 """20 从 HTML 文件中智能提取标题,优先级如下:21 1. 第一个非空 <h1>22 2. 第一个非空 <h2>23 3. <title> 标签内容(去除可能的站点后缀,如 " - My Blog")24 4. 返回 None(由调用方回退到文件名)25 """26 try:27 with open(file_path, 'r', encoding='utf-8') as f:28 soup = BeautifulSoup(f, 'html.parser')29 except (UnicodeDecodeError, OSError, Exception):30 return None31
32 # 1. 尝试 h133 h1 = soup.find('h1')34 if h1 and h1.get_text(strip=True):35 return h1.get_text(strip=True)36
37 # 2. 尝试 h238 h2 = soup.find('h2')39 if h2 and h2.get_text(strip=True):40 return h2.get_text(strip=True)41
42 # 3. 尝试 title(作为最后手段)43 title_tag = soup.find('title')44 if title_tag and title_tag.get_text(strip=True):45 raw_title = title_tag.get_text(strip=True)46 # 可选:简单清理常见的站点后缀(可根据需要扩展)47 # 例如:移除 " - My Site"、" | Blog" 等48 # 这里保留原始 title,你也可以按需处理49 return raw_title50
51 return None52
53
54def generate_blog_index(docs_dir="docs", output_file="index.html", title="我的博客"):55 """56 扫描指定目录下的所有 .html 文件,生成博客主页。57 58 参数:59 docs_dir (str): HTML 文件目录(默认: "docs")60 output_file (str): 输出文件路径(默认: "index.html")61 title (str): 博客主页标题62 """63 current_dir = Path.cwd()64 docs_path = (current_dir / docs_dir).resolve()65 output_path = (current_dir / output_file).resolve()66
67 if not docs_path.exists():68 print(f"❌ 错误: 目录 '{docs_path}' 不存在。")69 return70
71 output_path.parent.mkdir(parents=True, exist_ok=True)72
73 # 扩展排除列表:常见非文章 HTML 文件74 exclude_names = {75 "index.html", "blog.html", "home.html",76 "404.html", "sitemap.html", "robots.html",77 "_sidebar.html", "_navbar.html", "_footer.html",78 "search.html", "tags.html", "categories.html"79 }80
81 html_files = []82 for html_file in docs_path.rglob("*.html"):83 if html_file.name.lower() in exclude_names:84 continue85
86 rel_path = html_file.relative_to(docs_path)87 mtime = datetime.fromtimestamp(html_file.stat().st_mtime)88
89 # 提取标题:h1 > h2 > title > 文件名90 extracted_title = extract_title_from_html(html_file)91 if extracted_title:92 display_name = extracted_title93 else:94 display_name = rel_path.stem.replace("_", " ").replace("-", " ").title()95
96 html_files.append({97 "full_path": html_file,98 "rel_url": str(rel_path).replace(os.sep, "/"),99 "display_name": display_name,100 "mtime": mtime.strftime("%Y-%m-%d %H:%M"),101 "mtime_dt": mtime # 用于排序102 })103
104 # ✅ 按修改时间倒序排列(最新在前)105 html_files.sort(key=lambda x: x["mtime_dt"], reverse=True)106
107 def make_relative_link(target_path: Path) -> str:108 try:109 return os.path.relpath(target_path, output_path.parent).replace(os.sep, "/")110 except ValueError: # Windows 跨盘符111 return str(target_path).replace(os.sep, "/")112
113 # 构建 HTML 内容114 html_content = f"""<!DOCTYPE html>115<html lang="zh-CN">116<head>117 <meta charset="UTF-8">118 <meta name="viewport" content="width=device-width, initial-scale=1.0">119 <title>{title}</title>120 <style>121 body {{122 font-family: -apple-system, BlinkMacSystemFont, "Segoe UI", Helvetica, Arial, sans-serif;123 line-height: 1.6;124 max-width: 800px;125 margin: 40px auto;126 padding: 0 20px;127 color: #333;128 background-color: #fff;129 }}130 h1 {{131 text-align: center;132 margin-bottom: 30px;133 color: #2c3e50;134 }}135 .post-list {{136 list-style: none;137 padding: 0;138 }}139 .post-item {{140 padding: 12px 0;141 border-bottom: 1px solid #eee;142 }}143 .post-item:last-child {{144 border-bottom: none;145 }}146 .post-link {{147 text-decoration: none;148 color: #2980b9;149 font-size: 1.1em;150 font-weight: bold;151 }}152 .post-link:hover {{153 color: #e74c3c;154 text-decoration: underline;155 }}156 .post-meta {{157 font-size: 0.85em;158 color: #7f8c8d;159 margin-top: 4px;160 }}161 .empty {{162 text-align: center;163 color: #95a5a6;164 font-style: italic;165 }}166 </style>167</head>168<body>169 <h1>{title}</h1>170 <ul class="post-list">171"""172
173 if html_files:174 for item in html_files:175 link = make_relative_link(item["full_path"])176 # 转义 HTML 特殊字符(防止标题含 <, >, & 等破坏页面)177 safe_title = (178 item['display_name']179 .replace("&", "&")180 .replace("<", "<")181 .replace(">", ">")182 .replace('"', """)183 .replace("'", "'")184 )185 html_content += f""" <li class="post-item">186 <a class="post-link" href="{link}">{safe_title}</a>187 <div class="post-meta">路径: {link} | 更新: {item['mtime']}</div>188 </li>189"""190 else:191 html_content += ' <li class="empty">暂无文章</li>\n'192
193 html_content += """ </ul>194</body>195</html>"""196
197 with open(output_path, "w", encoding="utf-8") as f:198 f.write(html_content)199
200 print(f"✅ 成功生成博客主页: {output_path}")201 print(f"📄 共找到 {len(html_files)} 篇文章。")202
203
204def main():205 parser = argparse.ArgumentParser(206 description="扫描 docs 目录生成博客主页(智能提取 h1/h2/title 作为标题,按时间倒序)",207 formatter_class=argparse.RawTextHelpFormatter208 )209 parser.add_argument("--docs", default="docs", help="HTML 文件所在目录(默认: docs)")210 parser.add_argument("--output", default="index.html", help="输出文件路径(默认: index.html)")211 parser.add_argument("--title", default="Notebook", help="博客主页标题(默认: Notebook)")212
213 args = parser.parse_args()214 generate_blog_index(215 docs_dir=args.docs,216 output_file=args.output,217 title=args.title218 )219
220
221if __name__ == "__main__":222 main()📁 目录结构示例
xxxxxxxxxx81your-project/2├── generate_blog_index.py3├── docs/4│ ├── article1.html5│ ├── notes/6│ │ └── plc-tutorial.html7│ └── experiment.html8└── index.html ← 运行脚本后自动生成
▶️ 使用方法
1. 基本使用(默认参数)
xxxxxxxxxx11python generate_blog_index.py扫描
./docs/(默认输入)生成
./index.html(默认输出)标题为“Notebook”,可以通过添加
--title "我的笔记"参数修改默认标题。例如:
xxxxxxxxxx11python generate_blog_index.py --docs ./docs --output ./index.html --title "我的笔记"
⚠️ 首次使用请安装依赖:
pip install beautifulsoup4
2. 自定义参数
只指定输入目录
xxxxxxxxxx11python generate_blog_index.py --docs ./articles读取
./articles/输出到
./index.html
只指定输出文件
xxxxxxxxxx11python generate_blog_index.py --output blog.html读取
./docs/输出到
./blog.html
同时指定输入和输出
xxxxxxxxxx11python generate_blog_index.py --docs my_posts --output site/home.html读取
./my_posts/输出到
./site/home.html(自动创建site/目录)
🌟 功能特点
✅ 自动递归扫描子目录;
✅ 显示文件路径和最后修改时间,按更新时间倒序排列;
自动读取文件的最后修改时间(mtime)
文章列表最新更新的排在最前面,便于读者快速发现新内容
时间格式清晰显示:
YYYY-MM-DD HH:MM
✅ 智能标题提取(三级优先级)
文章标题按以下优先级自动识别,确保展示最合适的标题:
<h1>标签内容(首选,符合语义化 HTML 规范)<h2>标签内容(当无<h1>时自动降级)<title>标签内容(最终备选,适用于无正文标题的页面) 文件名回退(如my_post.html→ “My Post”)💡 即使 HTML 结构不规范,也能稳健解析,避免标题缺失。
✅ 响应式设计,适配手机;
✅ 简洁现代的 CSS 样式;
✅ 智能排除非文章文件;
自动跳过常见的非内容型 HTML 文件,避免干扰文章列表,包括:
索引类:
index.html,blog.html,home.html错误页:404.htmlSEO/工具页:sitemap.html,robots.html,search.html布局组件:_sidebar.html,_navbar.html,_footer.html分类/标签页:tags.html,categories.html✅ 支持中文路径和文件名;
✅ 自动 HTML 转义标题内容,防止
<,>,&等字符破坏页面结构✅ 跨平台路径兼容(Windows/Linux/macOS);
✅ 自动创建输出目录;
✅ 支持自定义输入目录、自定义输出路径(含子目录)。
💡 提示
默认设置生成的
index.html中的链接格式为:docs/xxx.html,确保你的 Web 服务器能正确访问docs/目录。使用 Typora 导出 HTML 到
docs/,这个脚本非常适合快速搭建一个本地博客索引页!
运行后,直接用浏览器打开 index.html 即可浏览和跳转所有文章。
托管发布笔记为在线博客
完成本地博客页面的生成后,下一步便是将这些静态 HTML 文件部署到互联网上,让全世界都能访问你的笔记博客。得益于现代静态网站托管服务的普及,这一过程变得异常简单且成本低廉(甚至免费)。本章将指导你如何将 Typora 导出并经脚本优化后的博客内容,快速部署到主流托管平台。
在托管发布笔记为在线博客之前,这里回顾总结一下本地博客页面生成的流程:
🌟 本地博客页面生成的流程总结
本地页面生成的完整流程可总结为以下四个核心步骤:
1. 导出 HTML 笔记(Typora)
在 Typora 中撰写 Markdown 笔记。
通过
文件 → 导出 → HTML将笔记导出为.html文件。建议统一导出到项目中的
docs/目录,便于管理。
2. 增强页面导航(自动插入跳转按钮)
使用
typora2blog.py脚本,在每篇 HTML 文章的标题(<h1>或<h2>)前插入“🏠 返回首页”链接。可通过 Typora 的「导出后运行自定义命令」功能实现自动执行:
xxxxxxxxxx11python "路径/typora2blog.py" "${outputPath}" --url "../index.html" --text "🏠 回到首页"此步骤确保每篇文章都能便捷跳转回博客主页。
Note
通过 Typora 的导出设置,可以实现导出 HTML 时,自动插入跳转按钮,详见🌟 在导出时自动添加跳转按钮该节。
3. 生成博客主页(自动索引)
运行
generate_blog_index.py脚本:xxxxxxxxxx31python generate_blog_index.py #默认设置 输入docs文件夹,输出index.html文件,标题为Notebook2#或者3python generate_blog_index.py --docs docs --output index.html --title "我的笔记"脚本会:
递归扫描
docs/目录下所有.html文件;排除
index.html等索引文件;生成美观、响应式的
index.html主页,包含文章列表、路径和更新时间。
4. 本地预览与验证
直接用浏览器打开
index.html,检查:主页是否正常列出所有文章;
点击链接能否跳转到对应笔记;
每篇笔记顶部和底部的导航按钮是否生效;
样式是否整洁、适配移动端。
5. 目录结构示例
脚本采用默认设置的情况下,基于上述几步,你应该能够获得类似的项目目录:
xxxxxxxxxx91your-project/2├── generate_blog_index.py3├── docs/4│ ├── article1.html5│ ├── article1.assets ← 文章图片文件夹,具体取决于你的Typora软件设置。6│ ├── notes/7│ │ └── plc-tutorial.html8│ └── experiment.html9└── index.html ← 运行脚本后自动生成
✅ 最终成果:一个结构清晰、导航完整、纯静态的本地博客网站,可直接用于后续的在线托管(如 GitHub Pages)。
🌐 为什么选择静态网站托管?
速度快:无需数据库或后端逻辑,直接由 CDN 分发 HTML、CSS、JS。
安全性高:没有动态脚本执行,几乎免疫常见 Web 攻击。
成本低:多数平台提供免费套餐,适合个人博客。
维护简单:只需上传文件,无需配置服务器或处理依赖。
🚀 推荐托管平台
以下是三个广受开发者欢迎、支持免费部署的平台:
| 平台 | 特点 | 适用场景 |
|---|---|---|
| GitHub Pages | 免费、集成 Git、自动构建、自定义域名支持 | 开源项目、技术博客 |
| Vercel | 极速部署、Git 自动同步、全球 CDN | 前端项目、静态博客 |
| Netlify | 表单支持、重定向规则、一键回滚 | 内容型网站、营销页面 |
本文以 GitHub Pages 为例进行详细说明,因其与本地 Git 工作流天然契合,且完全免费。
📦 准备部署目录结构
确保你的项目目录结构如下(与前文一致):
xxxxxxxxxx71my-blog/2├── docs/ # 存放所有 Typora 导出的 HTML 笔记3│ ├── hello-world.html4│ └── python-guide.html5├── index.html # 由 generate_blog_index.py 生成的主页6├── generate_blog_index.py7└── typora2blog.py
💡 提示:
index.html必须位于仓库根目录(或docs/目录,取决于 GitHub Pages 设置)。
🛠️ 步骤 1:创建 GitHub 仓库
登录 GitHub。
点击右上角 + → New repository。
仓库名建议为:
your-username.github.io(例如alice.github.io),这样 GitHub Pages 会自动启用。若使用其他名称(如
my-notes),后续需手动开启 Pages。
初始化时不要勾选“Add a README”(避免冲突)。
点击 Create repository。
📤 步骤 2:推送本地内容到 GitHub
Important
需要预先有 Git 知识,网上有很多类似方面的教程,此处不再展开叙述。
在项目根目录执行以下命令:
xxxxxxxxxx141# 初始化 Git 仓库(如果尚未初始化)2git init3
4# 添加所有文件5git add .6
7# 提交8git commit -m "feat: 首次部署博客"9
10# 关联远程仓库(替换 YOUR-USERNAME)11git remote add origin https://github.com/YOUR-USERNAME/YOUR-USERNAME.github.io.git12
13# 推送到 main 分支14git push -u origin main
⚠️ 注意:若仓库名不是
username.github.io,请将远程地址替换为你的实际仓库地址。
🌍 步骤 3:启用 GitHub Pages
进入你的 GitHub 仓库页面。
点击 Settings → 左侧 Pages。
在 Source 部分:
若
index.html在根目录,选择 Branch: main,Folder: / (root)。(默认设置下选择这个)若你希望从
docs/目录发布(index.html文件位于docs目录,常见于项目文档),则选择 Folder: /docs。
点击 Save。
等待 1–2 分钟,页面会显示类似:
✅ Your site is published at https://your-username.github.io
点击链接即可访问你的在线博客!
🔁 自动化更新流程(可选但推荐)
每次在 Typora 中导出新笔记后,只需三步即可更新线上博客:
xxxxxxxxxx81# 1. 将新 HTML 文件放入 docs/ 目录2# 2. 重新生成主页3python generate_blog_index.py4
5# 3. 提交并推送6git add .7git commit -m "chore: 添加新笔记《机器学习入门》"8git push
GitHub Pages 会在每次 push 后自动重新部署,无需手动操作。
🌐 自定义域名(进阶)
如果你拥有自己的域名(如 note.example.com),可在 GitHub Pages 中绑定:
在域名提供商处添加一条 CNAME 记录,指向
your-username.github.io。在仓库根目录创建
CNAME文件(无扩展名),内容为你的域名:xxxxxxxxxx11note.example.com在 GitHub Pages 设置中填写该域名。
完整指南见:GitHub Pages 自定义域名文档
✅ 验证部署效果
访问你的博客地址,应能看到:
清晰的首页文章列表;
每篇文章顶部有“🏠 回到首页”按钮;
为导出的HTML文件添加页脚的跳转按钮
底部有“🏠 我的博客”页脚链接(需要根据 为导出的HTML文件添加页脚的跳转按钮 此步设置);
所有链接可正常跳转;
移动端显示良好。
🧩 其他平台快速部署(简要)
静态网页部署过程较为简单,网上有很多类似教程,这里不再对其他平台部署过程展开叙述。
Vercel
安装 Vercel CLI:
npm install -g vercel在项目根目录运行:
vercel按提示登录并部署,自动获得
*.vercel.app域名。
Netlify
拖拽整个
my-blog文件夹到 Netlify Drop自动部署并生成临时链接。
🎉 小结
通过本章,你已成功将 Typora 笔记转化为一个可公开访问的在线博客。整个流程只需:
导出 HTML(Typora)
添加导航(
typora2blog.py)生成主页(
generate_blog_index.py)推送部署(GitHub Pages)
从此,你的知识不再局限于本地,而是以网页形式永久存档、随时分享。